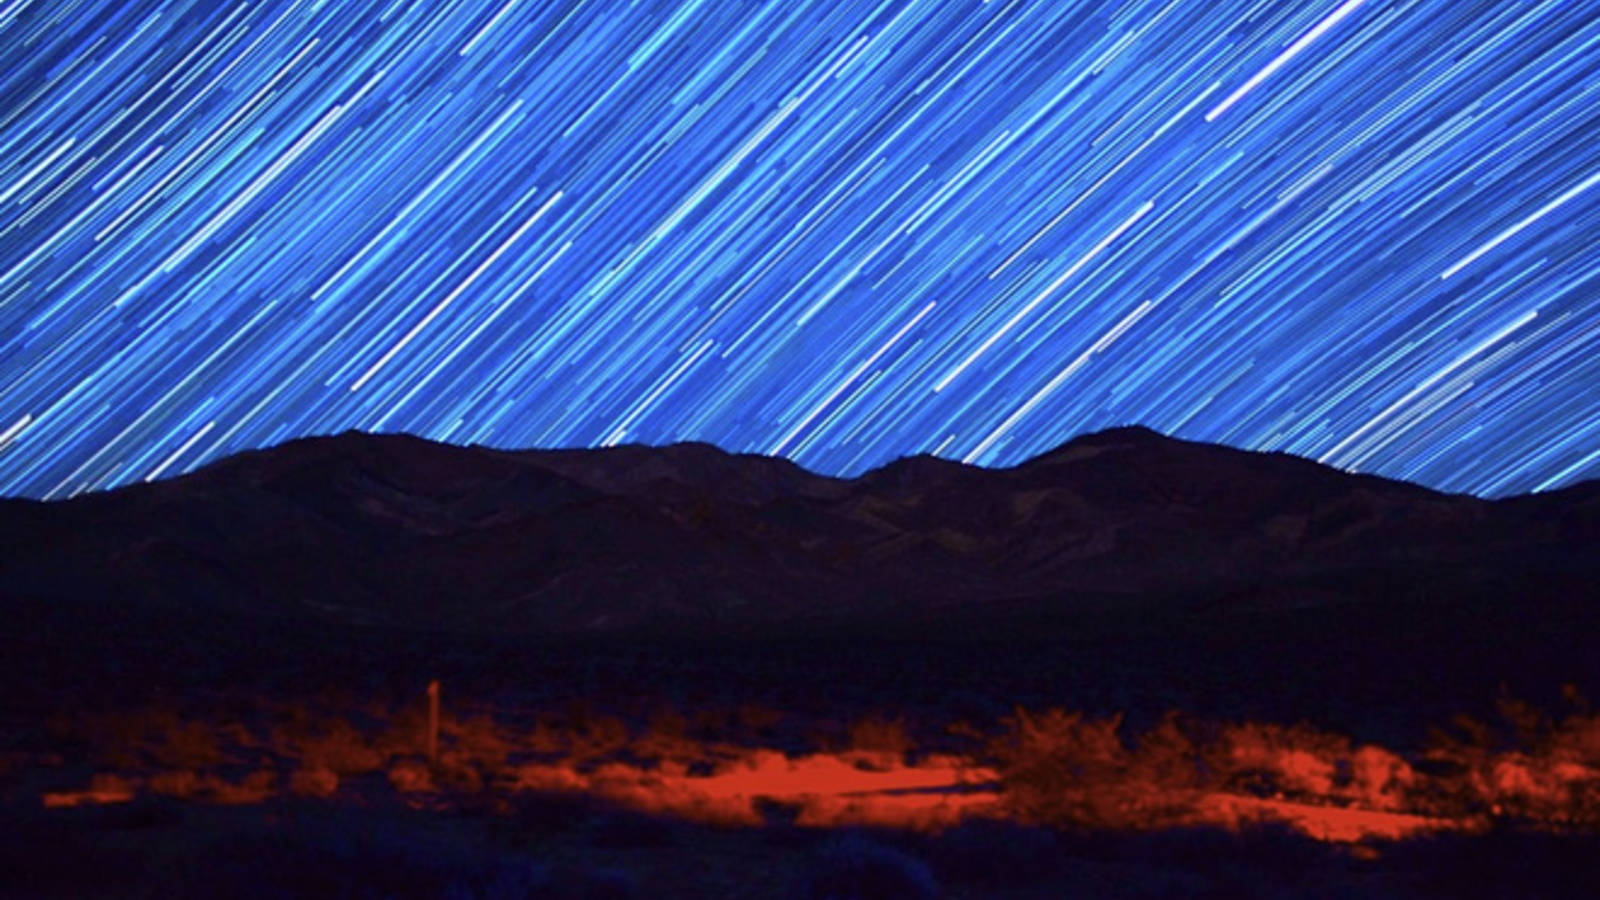
Filmmaker captures swirling, starry images of the park's famously dark night skies.
Last week, staff at NPCA escaped for a few minutes into the desert—virtually, at least—as we marveled at the latest video by Sunchaser Pictures, “Death Valley Dreamlapse” (below). Little did we know that the film crew captured these solitary dunes and spinning, swirling stars by traveling to a remote valley of the national park in below-freezing temperatures during a meteor shower last month.
We asked the filmmaker, Gavin Heffernan, about his experience creating the video. He shared his passion for parks and photography with us, and sent a few tips for other nature lovers thinking of creating their own time-lapse movies.
NPCA: What inspired you to film in desert national parks?
Gavin: My team and I work in Los Angeles as filmmakers. California’s close proximity to so many parks and wildlife areas gives us an abundance of riches when it comes to filming locations, both for day and night settings.
When shooting the night sky, we’re looking to get as far away from any light pollution as possible. One of our favorite spots is Joshua Tree, which is only about three hours’ drive from us, yet home to jaw-dropping skyscapes and landscapes. The Eureka Dunes in Death Valley are even further away from illuminated civilization, so the results can be even more stunning!
NPCA: Did you encounter anything unexpected or funny in making these videos?
Gavin: We were surprised by reactions to a “UFO” visible between 1:30 and 1:35 in the video! We added a small note about a very slow circling aircraft in the video description, and the internet exploded with theories from around the globe on what it was.
The aircraft appears to be maneuvering quickly and erratically because of the long-exposure time-lapse. This is misleading. The object is actually moving very, very slowly—one second of video equals about 10 minutes of shooting! Theories about the object have included aliens, experimental aircraft, weather balloons, flying DeLoreans, luck dragons, and more. Several UFO conspiracy sites have picked up the video and made guesses of their own. For more on the subject, here’s a brief Skype interview I did with Rightthisminute.com.
NPCA: Was creating a time-lapse video the initial goal, or did it evolve to that point?
Gavin: That was the goal. My team and I had recently completed a popular trilogy of day/night time-lapses called “Joshua Tree Journey,” and we were eager to branch out to more locations. Though we had never been there, the Eureka Dunes in Death Valley had always held a mythical place in our hearts, and with the coming Geminid meteor shower, we knew we had to strike. Even though the temperatures were supposed to drop very low that night, we bought some cold-weather gear and went for it!
NPCA: Do you have tips for creating time-lapse videos?
I learned a lot from the great community at Vimeo, where incredibly talented users are eager to share their works and techniques. I recommend browsing their excellent time-lapse clips and tutorials, then going out and doing some tests yourself.
Gavin Heffernan’s five quick tips for shooting starscapes and star trails.
1. Aim for nights with the smallest possible moon. At long exposures, the moon is extremely bright and can drown out a dark, starry sky. You can also experiment with different moon phases, as the effect of the moonlight moving over the dark terrain can also be pretty cool. With “Dreamlapse,” we got a perfect setup, as the Geminid peak came at a time when the moon was almost non-existent.
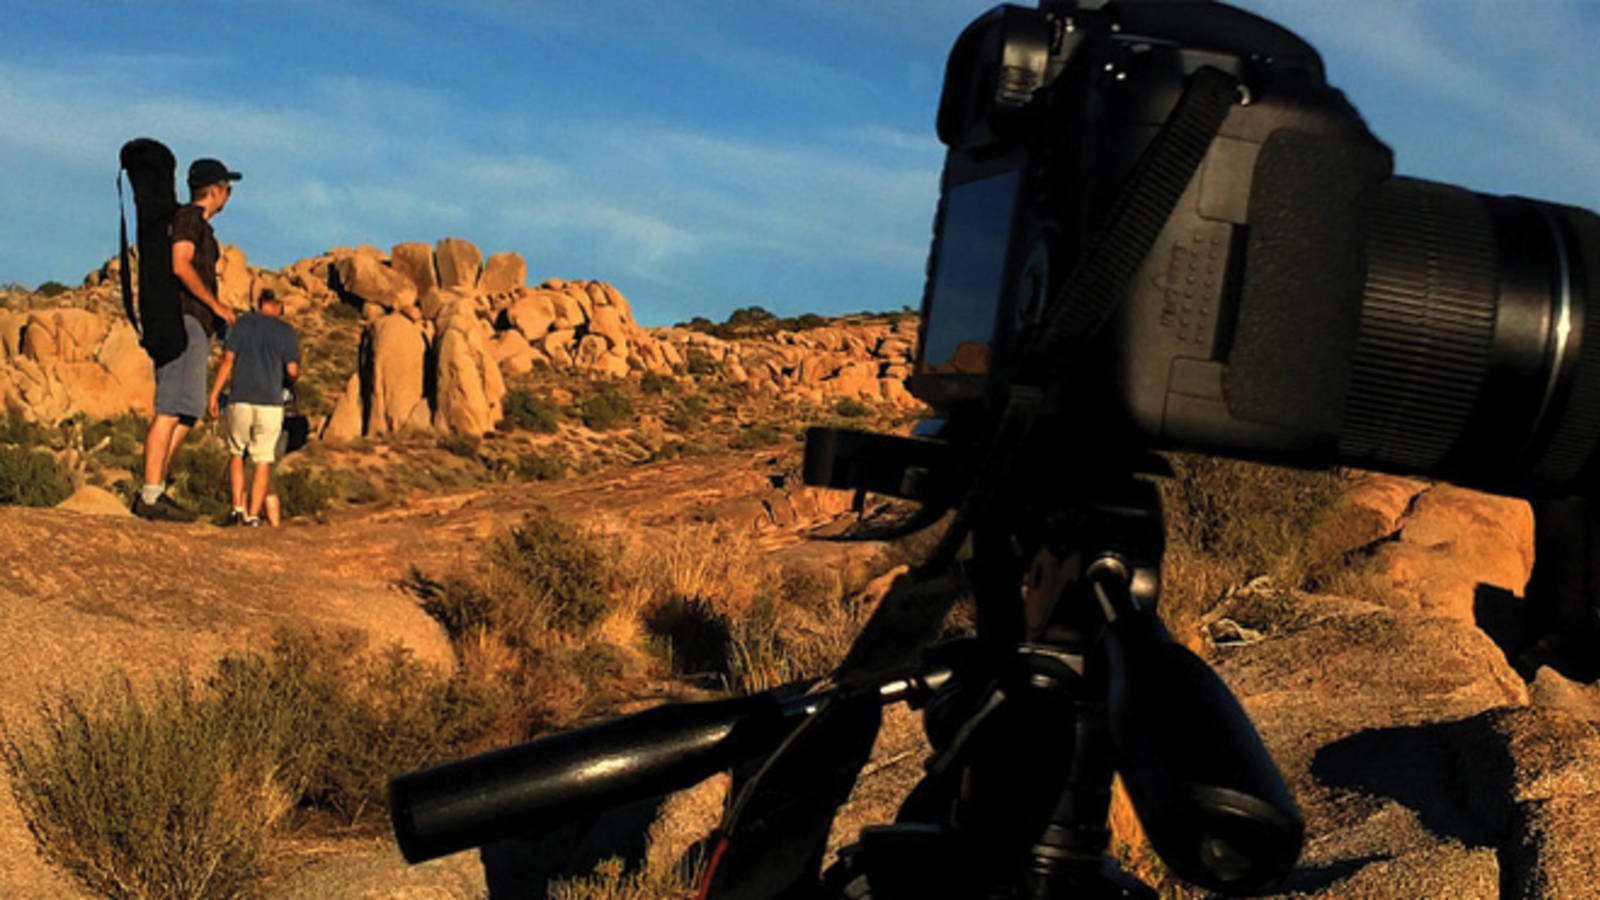
2. Set up your cameras far away from campsites and avoid stray lights. At long exposures (set between 20-30 seconds with a high ISO–I was shooting at 3200), even a tiny light source can interfere with the starscape (and even break the star trails). However, like most of these “rules,” you can break it to achieve artistic effects. For Dreamlapse, we used a small lantern to illuminate the foreground sand, to replicate the feeling of fire and highlight the mixed color temperatures.
3. Don’t touch the camera in the middle of a shoot! Sometimes even the slightest touch to the lens can shift the frame and ruin the entire effect–or make a nightmare in the editing room. We shoot with two cameras, which keeps us busy enough to avoid the temptation and allows us to get “total coverage.”
4. There are two ways to accomplish star trails. One is to simply take one picture with a very long exposure (like, 60 minutes). However, we use a technique that blends regular star shots (at 25-second exposures) using specialized software known as StarStaX. In either scenario, you need to avoid clouds at all costs! To get the “circle” effect, aim the camera for the North Star, and let the globe’s spin do the work for you! Once in a good position, I recommend shooting until the entire battery is done. On the Canon 5D we use, this is about 3.5 hours.
5. Don’t panic if things look grim! Even if the skies cloud over or conditions worsen, the camera may be seeing something you’re not. It's seeing the world with a set of superhuman eyes, so let the shot play out–you may be surprised. Some of the best shots in Terje Sorgjerd’s famous “The Mountain” time-lapse came in the middle of a sandstorm, with what Sorgjerd thought was zero visibility! In our Joshua Tree Storm video, we had a similar storm roll over and dampen our hopes, but we kept shooting and ended up getting amazing stuff that we never would have imagined. So stick with it and crack a beer. You’re in for the long haul, and you never know what you’re gonna get. Maybe even a UFO!
See more of Gavin’s work in Sunchaser’s “Joshua Tree Journey” series:
Part One: http://vimeo.com/15437000
Part Two: http://vimeo.com/37587197
Part Three (Storm): http://vimeo.com/53822527
Follow Gavin on Twitter: @GavinHeffernan. Check out Sunchaser Pictures on Facebook: https://www.facebook.com/SunchaserPicturesPage
About the author
-
 Kati Schmidt Director, Communications, Alaska, Northern Rockies, Northwest, Southwest, Pacific
Kati Schmidt is based in Oakland, CA, and leads media outreach and communications for the Pacific, Northwest, Northern Rockies, Alaska, and Southwest regions, along with NPCA's national wildlife initiatives.